Tuesday, February 19, 2013
Embellished Events Baby Thank You
I mass produced these baby duck cards for my cousin. She is using them as gifts to give expecting mothers; isn't that a great idea! Since they don't know what gender the babies will be, we wanted to keep the cards neutral, so we went with the So Saffron and Certainly Celery Colors.
To finish off the gift, I also made the boxes to hold the cards. I originally made a box in this post, but the link to the tutorial no longer worked. I have created my own tutorial, and will share it with you soon!
Stamps: Embellished Events
Ink: markers in So Saffron, Pumpkin Pie, Soft Suede
Paper: Whisper White, So Saffron, Certainly Celery
Other: Adorning Accents Edgelits, Windows Frames Collection Framelits, Adorning Accents Folders
Sunday, February 17, 2013
The Best Valentine in the World
When I was little, the book The Best Valentine in the World was one of my many favorites. It's the story about a fox who works hard to create a special valentine. Maybe it's the illustrations that captured my attention so much, and why, when I think of making valentines, I always want to include a touch of purple.
The card features the Hearts a Flutter stamp set and coordinating Framelits.
Stamps: Hearts a Flutter
Paper: Crumb Cake, Whisper White, Elegant Eggplant, Wisteria Wonder
Inks: Real Red, Elegant Eggplant, Wisteria Wonder
Other: Hearts a Flutter Framelits
The book is written by Marjorie Weineman Sharmat and illustrated by Lilian Obligado. Sadly, it is out of print, but this link will take you to Amazon where you can find used copies of it for sale.
Wednesday, February 13, 2013
Owl Valentines with Glow Sticks
These are the Valentines I made for my students this year, to coordinate with my new Owl Valentine Box, seen here.
They each hold a glow stick inside.
Face created with the Top Note Die and the Big Shot.
Eyes: 1 1/4 inch Scallop Circle Punch, 1 inch Circle Punch, 3/4 inch Circle Punch, smallest heart from the Triple Heart Punch (retired)
Nose: Red Glimmer Paper and Small Heart Punch
I used the two-way glue pen to put the eye parts together.
Colors: Regal Rose, Wisteria Wonder, Marina Mist, Bashful Blue, Whisper White and Basic Black
Owl Valentine Box
Last year, I finally threw away the old shoebox-covered-with-tissue-paper Valentine Box I'd been using since I was a little girl....it had seen better days! That meant this year, I would need to make a new box to use for my pre-kindergarten classroom, and I think this is definitely a step up from the old one. I also made owl Valentines to give each child; check for those in the next post!
Several people have asked for directions for this Valentine Box, so I'm providing a basic outline of the steps. Note that most of the materials listed are from Stampin' Up! so if you aren't sure what a certain item is, please ask. Also, several of the materials used may be retired, such as the fabric, but you could easily substitute with another choice of fabric.
Body:
1. Start with an empty cereal box. Tape the top closed to provide for extra support; I used packing tape.
2. Use an Xacto knife to cut a horizontal, rectangle slot on the back.
3. Cut a straight line down to the bottom of the box, then across the bottom of the box to make a door. I used my stylus from my Simply Scored score board and a ruler to make an indention down the left side, and creased the door open and shut a few times.
4. Cover the box with paper. I used Stampin' Up!'s textured cardstock in Real Red. Measure from the bottom of the box to the top. My 12x12 paper was very close to the same height, so I decided to leave the slight bit of overlap on the top.
5. Wrap the paper around the box to check the width. I had the paper start at the crease of the door and wrap around to the other side of the slot. If you lightly squeeze the sides, the paper will have the shape of the box and be easier to adhere.
6. I used sticky tape, which I applied to the box, then applied the textured paper. I used one strip at a time to make application of the paper to the box easier.
7. Measure the size of paper needed for the door, and adhere.
8. Cover area above mail slot with paper also. I also covered the top and bottom of the box.
Latch:
1. Punch two 3/4 inch circles from cardstock. Circles shown are in Pink Pirouette. Punch a smaller hole in the middle of them using the 1/16 inch Handheld Circle Punch.
2. Determine placement for your latch, and punch two small holes through the box, also using the 1/16 inch Circle Punch.
3. Use two brads to attach the circles to the box. Shown are two Basic Gray 3/8 inch Glimmer Brads.
4. Tie Whisper White Baker's Twine under one of the circles, then loop around both circles to complete the latch.
Wings:
1. Cut a medium circle (I traced something round....I don't remember what) from the Real Red cardstock. I traced the same circle on the back of fabric and adhered the two together using my ATG double sided tape gun. The fabric shown is Candy Cane Christmas.
2. Cut in half to make the two wings.
Face:
1. I punched the large white circles using the 2 inch circle punch.
2. I used the Scallop Punch to punch two Wild Wasabi scallops.
3. Punch two 1 inch white circles.
4. I used dimensionals to pop out the Bashful Blue 3/4 inch circles and heart punched from the Small Heart Punch.
5. Her nose is created from the Full Heart Punch and Champagne Glimmer Paper.
6. I again used my ATG glue gun to adhere the pieces together. You could also use a different adhesive.
Feet:
1. I punched two scallops for each foot using the Scallop Punch and Crumb Cake card stock.
Dress:
1. I cut the material into 12 inch strips, approximately 2 inches wide.
2. I started at the bottom and used a hot glue gun to run a bead of glue across the box and pressed the material into place. As the layers went higher, I also glued the material together on the sides.
3. I used Real Red Satin Ribbon across the top of her dress, and to make the bow for her head.
Please leave comments; I'd love to hear your feedback.
Sunday, February 10, 2013
Doilies Valentine
Attempting to make a card that could be adapted to other occasions, I came up with this design featuring the Delicate Doilies stamp set. I love the Two-Tone ribbon in Pink Pirouette/Rose Red.
Stamps: Delicate Doilies, Teeny Tiny Wishes
Inks: Cherry Cobbler, Wisteria Wonder, Pink Pirouette
Paper: Cherry Cobbler, Wisteria Wonder
Other: Two Tone Ribbon in Pink Pirouette/Rose Red, Word Window Punch, Modern Punch
Saturday, February 9, 2013
Happy Valentine's Day
Monday, February 4, 2013
Paper Pumpkin Hey There!
This card comes from the Paper Pumpkin Monthly Kit that I received at Stampin' Up!'s Leadership last month.
For only $19.95 a month, which INCLUDES shipping, the Paper Pumpkin is magically delivered to your mailbox! Every month you will get all of the supplies you need to make quick, crafty projects. This beginning kit contains a D block, stamp set, ink spot, and enough materials to make 4 of these cards. I did add the little bit of Baker's Twine to the button, but otherwise, everything you see on my card is included in the kit!
Click here to subscribe today, and remember to put in my name (Lori Woods) when it asks for your demonstrator!
Sunday, February 3, 2013
Birthday Butterflies
Saturday, February 2, 2013
Oh, Hello with butterfly
Another take on the same style as yesterday's card, this one uses the Oh, Hello stamp set and both the Butterfly Punch and Bitty Butterfly Punch.
Stamps: Oh, Hello
Inks: Pool Party; Markers in Pool Party, Rich Razzleberry, Tangerine Tango, Old Olive
Paper: Whisper White, Pool Party, Sycamore Street DSP
Other: Pool Party 3/8 inch Ruffled Ribbon, Dimensionals, Simply Scored, Butterfly Punch, Bitty Butterfly Punch
Friday, February 1, 2013
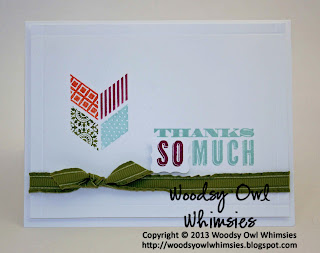
Thanks SO Much card using "Oh, Hello" stamp set
This is the second card we are going to make at Stamp Camp...if the weather would only cooperate!
Stamps: Oh, Hello
Inks: Pool Party, Markers in Rich Razzleberry, Pool Party, Tangerine Tango, Lucky Limeade
Paper: Whisper White
Other: Lucky Limeade 3/8 inch Ruffled Ribbon, Simply Scored, Dimensionals, Petite Curly Label Punch
Best of Love February Stamp Set
Happy
25th anniversary to us! Every month during 2013, we’re smashing up some
of our all-time-favorites with a new, never-before-seen stamp to create
a monthly “Best of” stamp set. And what else would you expect from a
February set than images that will help you make that perfect Valentine?
Share the love with the Best of Love set!
Note: Clear-Mount Blocks B, C, and D needed for this set.
Heart Block D
Read my Lips Block B
Olive You Block B
Love You Much Block B
Love You Block C
Love Block D
Note: Clear-Mount Blocks B, C, and D needed for this set.
Heart Block D
Read my Lips Block B
Olive You Block B
Love You Much Block B
Love You Block C
Love Block D
SU Updates and Special Offers
Four updates included, read all the way through!
1. Sent with Love Special Offer
During this limited-time offer, you can:
(images not shown to size)
**purchase
the Clear Mount Sent with Love Stamp Set 131847 for $17.95, OR**Sent with Love Designer Series Paper 132182 $10.95, OR
**bundle the Sent with Love Stamp Set, Sent with LoveDesigner Series Paper in the Pretty Bundle 132851, and get Calypso Coral Baker's Twine, for a special 20 percent discount, $25.50!
2. Champagne Glimmer Paper Still Available
Though not pictured on the carryover page, Champagne Glimmer Paper (Item 127885) from the 2012 holiday catalog is still available to order. Order yours today!3. Digital Content Discs for One Dollar
From now until February 12 (or while supplies last) you can get your hands on any of these content discs for just $1. That's not a typo--they're just one buck. So indulge--it won't break the bank.- Avant-Garde Collection DVD (item 125841)
- Cheerful Treats Digital Content CD (item 124237)
- Express Booster Pack DVD (item 124889)
- His & Hers Collection DVD (item 125842)
- October, December, Whenever Collection DVD (item 124485)
- Simple Snapshots Content CD (item 127185)
- Sweet Retreat Collection DVD (item 125840)
4. 12" x 12" Early Espresso Album Available While Supplies Last
The 12" x 12" Early Espresso Album (item 127685) must make an early exit. Our supplier will not be able to continue to produce this product without a significant cost increase to us, and consequently, to you. We have ultimately decided to discontinue this album. Our supply is running low, order yours now.
Subscribe to:
Posts (Atom)